The Transactions Page
This is the ledger: every transaction you have imported or typed in, newest first. Most of what happens in Aventurine happens because of what is on this page.
The table
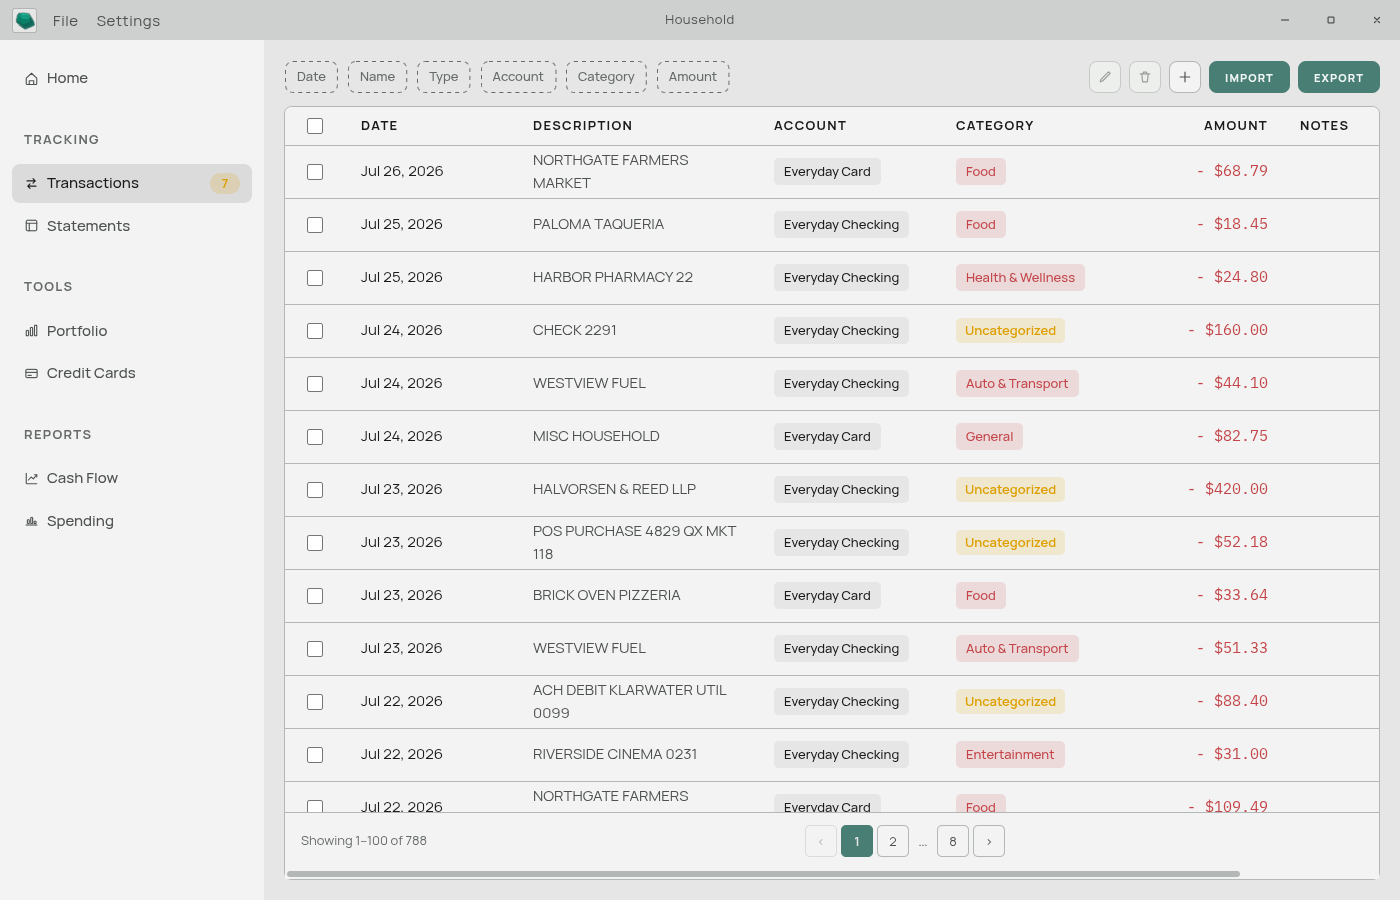
Seven columns, left to right.
Checkbox — ticks a row for the Edit and Delete buttons above.
Date — shown in the format you chose in Preferences. Rows are sorted newest first; two transactions on the same day are ordered with the most recently added on top.
Description — what the transaction is.

For rows where Aventurine recognized the merchant, this shows a clean name with a small arrow next to it — “Trader Joe’s” instead of TRADER JOE S #221 SEATTLE WA, as in the middle row above. Click it to reveal the original text from your bank underneath; click again to hide it. Rows the app did not recognize show your bank’s text directly, with no arrow. Nothing is ever rewritten — the original is always there. See Merchant Names.
Account — which of your accounts this came from, as a small tag. A dash means the transaction is not filed under any account, which happens with rows you typed in by hand.
Category — a coloured pill.
The colour tells you the direction: green for income, red for an expense, blue for a transfer. An uncategorized row shows an amber “Uncategorized” pill. There is no separate Type column — the pill’s colour is the type. See Money In Money Out and Transfers.
Amount — always shown as a positive number with a sign in front and a colour behind it. - $42.10 in red is spending; + $2,400.00 in green is income. Aventurine stores amounts as plain magnitudes and keeps the direction separately, which is why you never see a stray minus sign in the wrong place.
Notes — anything extra, from you or from a notes column in your import file.
Paging

The table shows 100 rows at a time. When there are more, a footer appears with page numbers and a “Showing 1–100 of 1,432” count.
Paging only affects what is drawn. Filters, exports, and the row count all work on the full filtered set.
The filter chips

Above the table sits a row of dashed outlines: Date · Name · Type · Account · Category · Amount. Each is one filter. Click one and a small panel drops down.
A chip that has a value fills in with colour, reads Field : value, and grows an × to clear it. When any chip is active, a Clear all button appears at the end of the row.
Filters combine — set three and you get rows matching all three. Everything filters as you type, with no searching or loading step.
| Chip | Panel contents |
|---|---|
| Date | Quick buttons for This week / This month / This year, plus From and To date boxes. “This week” starts on the day you chose in Preferences → Format. |
| Name | A “Description contains” box. It searches both the clean merchant name and your bank’s original text, so either one finds the row. |
| Type | All / Income / Expense / Transfer. |
| Account | All / No account / then each of your accounts. |
| Category | All / Uncategorized / then your categories, grouped by type. |
| Amount | Quick buttons (under 50, under 100, over 100), plus Min and Max boxes. Amounts are compared as plain magnitudes, so "over 100” catches both a 150 paycheck and a 150 bill. |
Full detail in Finding Transactions.
Arriving here from a chart
Clicking a category in the Cash Flow diagram brings you here with the year and that category already filtered. The chips light up so you can see what was applied, and you can adjust or clear them like any other filter.
The action buttons

On the right of the chip row.
Pencil — edit the ticked rows. Disabled until you tick something; hovering it tells you how many are selected. See Editing Many Transactions at Once.
Trash — delete the ticked rows, after a confirmation. This cannot be undone.
Plus — add a transaction by hand. A blank row appears at the top of the table for you to fill in. See Adding and Editing Transactions.
Import — bring in a file from your bank. See Importing Transactions.
Export — save what you are currently looking at to a file. If filters are on, only the matching transactions are exported. See Exporting Your Data.
How selection behaves
Three rules, all of which exist to stop you acting on something you cannot see.
The header checkbox selects the current page only. Not all 1,432 rows — the 100 in front of you.
Selections survive paging. Tick rows on page 1, move to page 2, tick more: all of them are selected. The Edit and Delete buttons show the combined count.
Changing a filter drops hidden rows from the selection. If you select 40 rows and then narrow the filter so only 12 are visible, the other 28 are silently deselected. A bulk delete can never reach a row that is off screen.
Editing a row

Existing rows are edited through the pencil button, not in place. Tick the row, click the pencil, and a dialog opens with every field editable. This is the same dialog whether you selected one row or fifty.
New rows are typed directly into the table. The plus button adds an inline row at the top with a date, description, account, category, amount, and notes. Save it with the tick, Enter, or cancel with the × or Escape.
There is one deliberate difference between the two. The inline add row has no Type control, because a new row’s direction comes from the category you give it. The edit dialog does have one, because it is the only place to set the direction of a row you are leaving uncategorized.
Why Type is usually locked
In the edit dialog, the Type dropdown greys out as soon as a row has a category. That is not a bug.
A category owns its direction. “Rent / Mortgage” is an expense category, so anything filed under it is an expense — there is no combination of settings that produces income filed under Rent. Only rows with no category get to pick their own direction. See Money In Money Out and Transfers.
What happens after you categorize
Two things, both invisible at the time:
- A rule is remembered. The description you just categorized is stored, and future transactions with the same description are categorized automatically. Removing a category removes the rule.
- Similar rows are offered. If you categorized a row and other uncategorized rows share its description, a dialog appears offering to apply the same category to all of them. It comes pre-ticked; Skip dismisses it.
Related: Adding and Editing Transactions · Finding Transactions · Editing Many Transactions at Once · Importing Transactions